

Observables a Signals con toSignal en Angular
La reactividad en Angular ha evolucionado significativamente, especialmente con la introducción de Signals. En este artículo, discutiremos cómo trabajar con Angular, Reactividad, Signals y RxJS. Aprenderás a transformar observables en Signals usando la función toSignal, facilitando así la transición y reutilización de código existente en tus aplicaciones Angular.
ToSignal: La Función de Transición
Esta una función permite transformar observables de RxJS en Signals. Esto facilita la reutilización del código existente mientras abrazamos este nuevo modelo de reactividad. toSignal es especialmente útil para mantener la lógica de negocios en RxJS, al tiempo que se utilizan Signals para el renderizado y otros aspectos de la UI.
Implementación Básica de ToSignal
Creando un Observable
Veamos un ejemplo sencillo donde creamos un observable básico en Angular:
import { Component } from '@angular/core';
import { AsyncPipe } from '@angular/common';
import { Subject } from 'rxjs';

@Component({
  selector: 'app-root',
  standalone: true,
  imports: [AsyncPipe],
  template: `
    <h2>state$: {{ state$ | async }}</h2>
    <input type="text" #input>
    <button (click)="change(input.value)">Change state</button>
  `,
})
export class AppComponent {
  state$ = new Subject<string>();

  change(newValue: string) {
    this.state$.next(newValue);
  }
}
Transformando el Observable a Signal
Ahora, transformemos este observable en un Signal usando la función toSignal:
import { Component } from '@angular/core';
import { Subject } from 'rxjs';
import { toSignal } from '@angular/core/rxjs-interop';

@Component({
  selector: 'app-root',
  standalone: true,
  template: `
    <h2>state$: {{ state() }}</h2>
    <input type="text" #input>
    <button (click)="change(input.value)">Change state</button>
  `,
})
export class AppComponent {
  state$ = new Subject<string>();
  state = toSignal(this.state$);

  change(newValue: string) {
    this.state$.next(newValue);
  }
}
Usando toSignal, hemos transformado el observable state$ en un Signal state y podemos evitar el uso del AsyncPipe en la plantilla.
Opciones de la función ToSignal
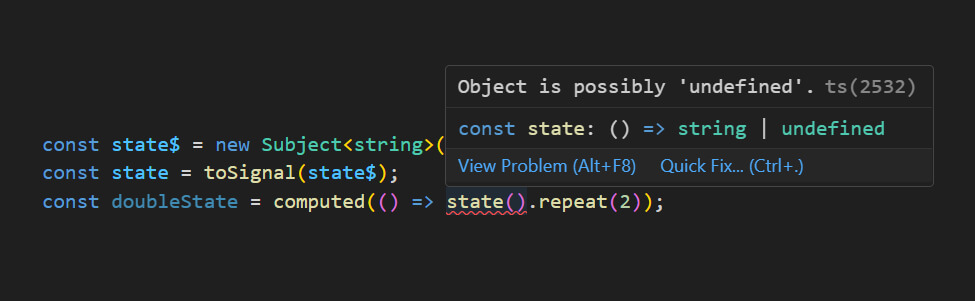
Initial Value
Está opción se usa cuando trabajamos con observables que no tienen un valor inicial. Permite configurar un valor inicial de manera que el Signal siempre tenga un valor para renderizar. Esto evita que el Signal tenga el valor undefined hasta que el observable emita un valor.
Fijate en el siguiente ejemplo:
import { computed } from '@angular/core';
import { Subject } from 'rxjs';
import { toSignal } from '@angular/core/rxjs-interop';

const state$ = new Subject<string>();
const state = toSignal(state$);
const doubleState = computed(() => state().repeat(2));

state(); // undefined
En este caso, state es undefined hasta que state$ emita un valor y por ejemplo, si intentamos duplicar el valor de state usando un computed, obtendremos una alerta por parte de TypeScript notificando que state es undefined.
Para evitar esto, podemos usar la opción initialValue:
import { Subject } from 'rxjs';
import { toSignal } from '@angular/core/rxjs-interop';
import { computed } from '@angular/core';

const state$ = new Subject<string>();
const state = toSignal(state$, { initialValue: 'value from signal' });
const doubleState = computed(() => state().repeat(2));

state(); // value from signal
doubleState(); // value from signalvalue from signal
Require Sync
Esta opción sincroniza el Signal con el valor inicial del observable si este tiene un valor inicial. Muy útil cuando necesitamos que el Signal tenga el mismo valor que el observable desde el principio.
import { BehaviorSubject } from 'rxjs';
import { toSignal } from '@angular/core/rxjs-interop';

const state$ = new BehaviorSubject('value from observable');
const state = toSignal(state$, { requireSync: true });

state(); // 'value from observable'
Reject Errors
En caso de que el observable genere un error, esta opción permite que el Signal mantenga su último valor válido. Imagina que tenemos un observable que emite valores cada segundo y, después de 5 segundos, lanza un error. Si no usamos rejectErrors, el Signal se detendrá y no emitirá más valores. Sin embargo, si usamos rejectErrors, el Signal mantendrá el último valor válido.
import { interval, tap } from 'rxjs';
import { toSignal } from '@angular/core/rxjs-interop';

const interval$ = interval(1000)
.pipe(
  tap((value) => {
    if (value === 5) {
      throw new Error('Something went wrong');
    }
    return value;
  })
);

const intervalValue = toSignal(interval$, { initialValue: 0, rejectErrors: true });

intervalValue(); // 5
Ejemplo Real: Integración con HTTP Client
Ahora, veamos un ejemplo más realista de cómo transformar un observable de un servicio HTTP en un Signal.
Servicio HTTP
Supongamos que tenemos un servicio que obtiene datos desde una API con el metodo getLocations que sería un observable de RxJS sin un valor inicial es decir el valor se trasmitirá cuando la petición HTTP se complete.
import { HttpClient } from '@angular/common/http';
import { inject, Injectable } from '@angular/core';

export interface Location {
  id: number;
  name: string;
  description: string;
  latitude: number;
  longitude: number;
}

@Injectable({
  providedIn: 'root'
})
export class DataService {
  private http = inject(HttpClient);

  getLocations(){
    const path = `https://api.nicobytes.store/api/v1/locations`;
    return this.http.get<Location[]>(path);
  }
}
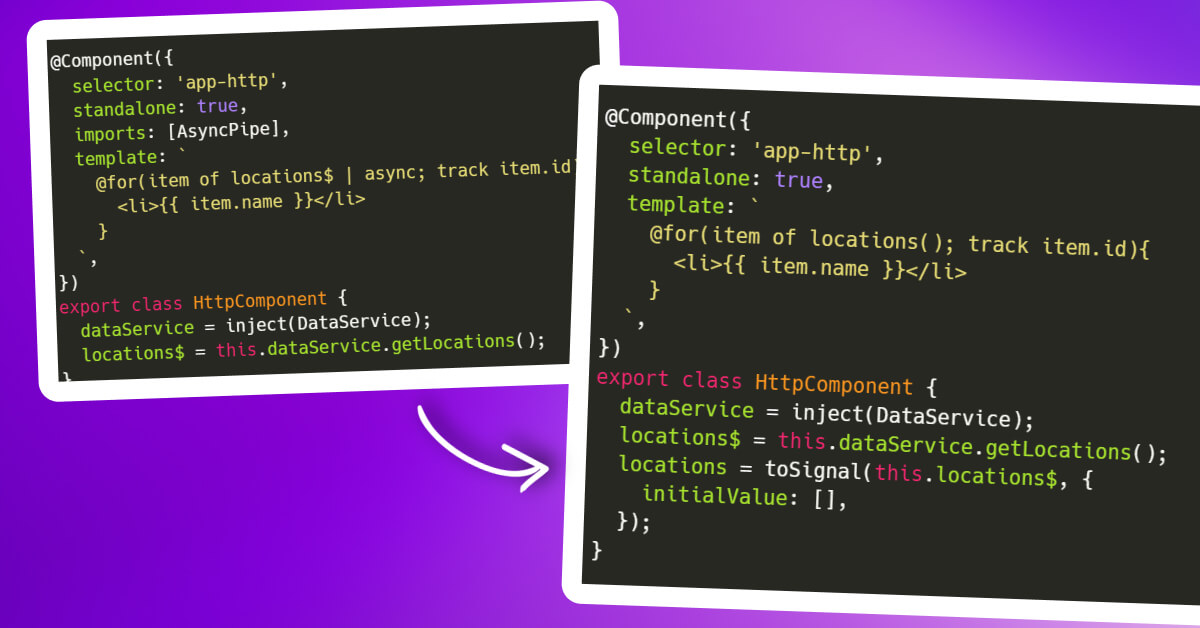
Ahora transformemos el observable del servicio en un Signal para que el componente pueda renderizar los datos de la API.
import { Component, inject } from '@angular/core';
import { toSignal } from '@angular/core/rxjs-interop';
import { DataService } from './data.service';

@Component({
  selector: 'app-data',
  standalone: true,
  template: `
    @for(item of locations(); track item.id){
      <li>{{ item.name }}</li>
    }
  `,
})
export class DataComponent {
  dataService = inject(DataService);

  locations$ = this.dataService.getLocations();
  locations = toSignal(this.locations$, {
    initialValue: []
  });
}
Video Tutorial
Si quieres ver el video completo de como transformar observables a signals usando la función toSignal en Angular, puedes verlo aquí:
Conclusión
La función toSignal facilita la adopción y utilización del nuevo modelo de reactividad de Angular sin tener que abandonar la robusta lógica construida con RxJS. La clave está en identificar los casos de uso adecuados y emplear las opciones como initialValue, requireSync, y rejectErrors según la necesidad del proyecto.
Implementar Signals puede transformar la forma en que tus aplicaciones Angular manejan la reactividad, proporcionando un rendimiento más granular y una gestión más sencilla del estado de la UI.