

Observables to signals using toSignal in Angular
Reactivity in Angular has significantly evolved, especially with the introduction of Signals. In this article, we will discuss how to work with Angular, Reactivity, Signals, and RxJS. You will learn how to transform observables into Signals using the toSignal function, making it easier to transition and reuse existing code in your Angular applications.
ToSignal: The Transition Function
This function allows converting RxJS observables into Signals. This facilitates the reuse of existing code while embracing this new model of reactivity. toSignal is especially useful for maintaining business logic in RxJS while using Signals for rendering and other aspects of the UI.
Basic Implementation of ToSignal
Creating an Observable
Let’s look at a simple example where we create a basic observable in Angular:
import { Component } from '@angular/core';
import { AsyncPipe } from '@angular/common';
import { Subject } from 'rxjs';

@Component({
  selector: 'app-root',
  standalone: true,
  imports: [AsyncPipe],
  template: `
    <h2>state$: {{ state$ | async }}</h2>
    <input type="text" #input>
    <button (click)="change(input.value)">Change state</button>
  `,
})
export class AppComponent {
  state$ = new Subject<string>();

  change(newValue: string) {
    this.state$.next(newValue);
  }
}
Transforming the Observable into a Signal
Now, let’s transform this observable into a Signal using the toSignal function:
import { Component } from '@angular/core';
import { Subject } from 'rxjs';
import { toSignal } from '@angular/core/rxjs-interop';

@Component({
  selector: 'app-root',
  standalone: true,
  template: `
    <h2>state$: {{ state() }}</h2>
    <input type="text" #input>
    <button (click)="change(input.value)">Change state</button>
  `,
})
export class AppComponent {
  state$ = new Subject<string>();
  state = toSignal(this.state$);

  change(newValue: string) {
    this.state$.next(newValue);
  }
}
Using toSignal, we have transformed the state$ observable into a Signal state and can avoid using the AsyncPipe in the template.
Options for the ToSignal Function
Initial Value
This option is used when working with observables that do not have an initial value. It allows setting an initial value so that the Signal always has a value to render. This prevents the Signal from being undefined until the observable emits a value.
Check out the following example:
import { computed } from '@angular/core';
import { Subject } from 'rxjs';
import { toSignal } from '@angular/core/rxjs-interop';
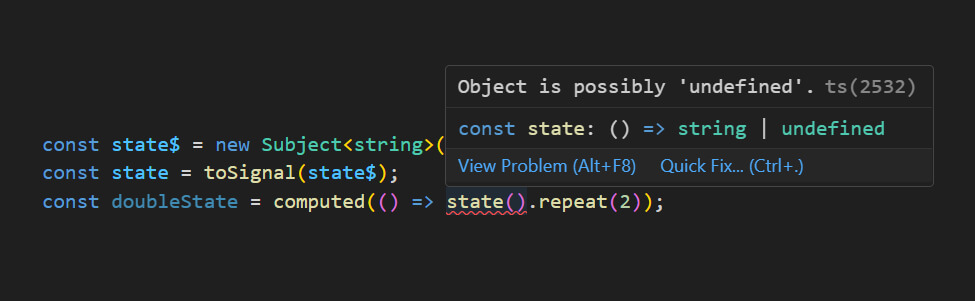
const state$ = new Subject<string>();
const state = toSignal(state$);
const doubleState = computed(() => state().repeat(2));
state(); // undefined
In this case, state is undefined until state$ emits a value and if we try to duplicate the value of state using a computed, we will get an alert from TypeScript notifying that state is undefined.
To avoid this, we can use the initialValue option:
import { Subject } from 'rxjs';
import { toSignal } from '@angular/core/rxjs-interop';
import { computed } from '@angular/core';

const state$ = new Subject<string>();
const state = toSignal(state$, { initialValue: 'value from signal' });
const doubleState = computed(() => state().repeat(2));

state(); // value from signal
doubleState(); // value from signalvalue from signal
Require Sync
This option synchronizes the Signal with the initial value of the observable if it has an initial value. Very useful when we need the Signal to have the same value as the observable from the beginning.
import { BehaviorSubject } from 'rxjs';
import { toSignal } from '@angular/core/rxjs-interop';

const state$ = new BehaviorSubject('value from observable');
const state = toSignal(state$, { requireSync: true });

state(); // 'value from observable'
Reject Errors
In case the observable generates an error, this option allows the Signal to keep its last valid value. Imagine we have an observable that emits values every second and, after 5 seconds, throws an error. If we do not use rejectErrors, the Signal will stop and will not emit more values. However, if we use rejectErrors, the Signal will keep the last valid value.
import { interval, tap } from 'rxjs';
import { toSignal } from '@angular/core/rxjs-interop';

const interval$ = interval(1000)
.pipe(
  tap((value) => {
    if (value === 5) {
      throw new Error('Something went wrong');
    }
    return value;
  })
);

const intervalValue = toSignal(interval$, { initialValue: 0, rejectErrors: true });

intervalValue(); // 5
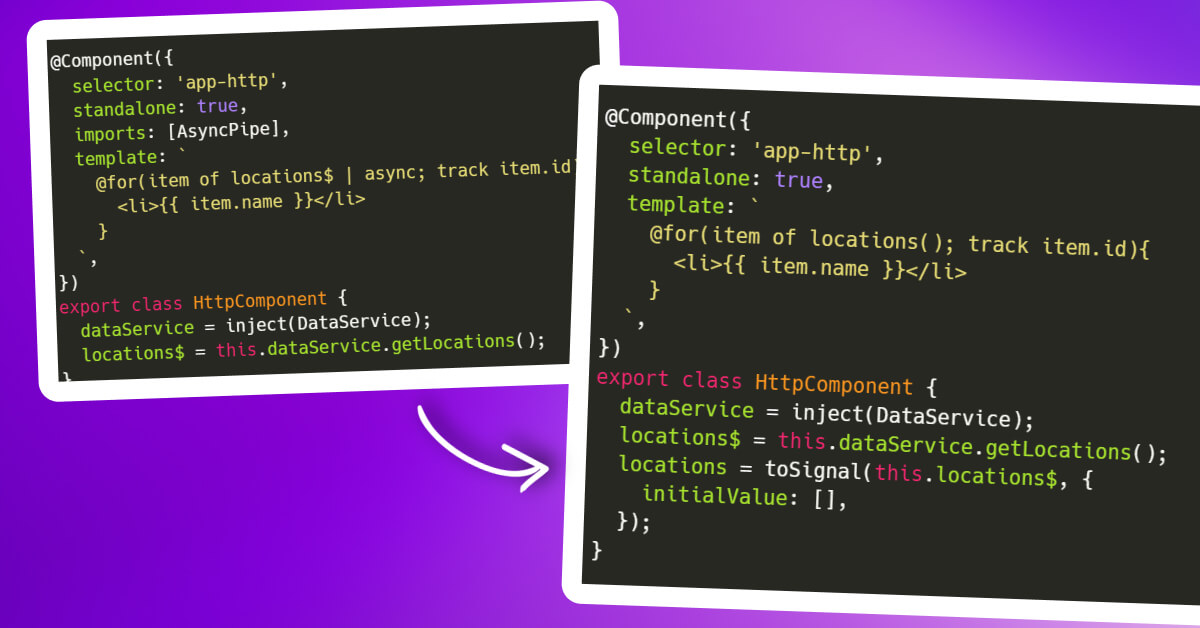
Real Example: Integration with HTTP Client
Now, let’s look at a more realistic example of how to transform an observable from an HTTP service into a Signal.
HTTP Service
Suppose we have a service that obtains data from an API with the method getLocations which would be a RxJS observable without an initial value, meaning the value will transmit when the HTTP request completes.
import { HttpClient } from '@angular/common/http';
import { inject, Injectable } from '@angular/core';

export interface Location {
  id: number;
  name: string;
  description: string;
  latitude: number;
  longitude: number;
}

@Injectable({
  providedIn: 'root'
})
export class DataService {
  private http = inject(HttpClient);

  getLocations(){
    const path = `https://api.nicobytes.store/api/v1/locations`;
    return this.http.get<Location[]>(path);
  }
}
Now let’s transform the service’s observable into a Signal so that the component can render the API data.
import { Component, inject } from '@angular/core';
import { toSignal } from '@angular/core/rxjs-interop';
import { DataService } from './data.service';

@Component({
  selector: 'app-data',
  standalone: true,
  template: `
    @for(item of locations(); track item.id){
      <li>{{ item.name }}</li>
    }
  `,
})
export class DataComponent {
  dataService = inject(DataService);

  locations$ = this.dataService.getLocations();
  locations = toSignal(this.locations$, {
    initialValue: []
  });
}
Conclusion
The toSignal function facilitates the adoption and utilization of Angular’s new reactivity model without having to discard the robust logic built with RxJS. The key is to identify the appropriate use cases and employ options like initialValue, requireSync, and rejectErrors according to the project’s needs.
Implementing Signals can transform the way your Angular applications handle reactivity, providing more granular performance and simpler state management for the UI.